
After the large number of articles that we have recently made about the best-paid VPNs, free ones, etc., it is time to see how to create a VPN with OpenVPN in Windows 10. It is a procedure that is available to everyone as long as we meet some basic requirements that of course, we will explain.
It will be a long tutorial since we will configure in detail both the server and the client under Windows, specifically Windows 10, although it is extensible to other versions. We will make the connection with the client through a LAN, but we will explain and see the process to do it remotely from anywhere by opening the ports of our router. Without further ado, let’s begin the procedure.
VPN network and some prerequisites
If we plan to configure a VPN server and client, it is normal that by now we all know what a VPN is, and if you have accessed this article, it must be so. Virtual Private Networks are basically extensions of a LAN network over the domains of a WAN network, such as the Internet.
By extending a LAN to the Internet, we are managing to link geographically separated hosts under the direction of a server that acts as a router. The transport of data between clients is carried out in an encrypted way, through tunnels through the network to isolate this data from access by hosts external to our network.
Some of the requirements that we must meet before creating a VPN network in Windows will be the following:
- Have an Internet connection, that is more than clear.
- We need at least one computer with Windows 10, 8, 7, Server, or any of those not really mentioned.
- If we plan to use it remotely, we need access to our router to open ports, a fixed IP, or a DDNS function, for example with a DYNDNS account to set a domain with dynamic IP.
In any case, we can start using the OpenVPN network on our own LAN and then take the step to increase it to the Internet if we are going to use it from outside our home. One of the most basic reasons to use a VPN is to encrypt our connections, although it is also possible to access content from our country from abroad if we travel.
OpenVPN protocol
One of the most widely used protocols to carry this connection and transport via cable is OpenVPN, which in addition to being a communication protocol is also a computer application that performs server and client functions on the computers involved. This is based on encrypted links of the SSL and TLS type with fairly strong encryption on UDP frames mainly, although TCP can also be used.
This point-to-point based protocol requires hierarchical validation between client and server. Specifically, it is done remotely using SSL/TLS type certificates + RSA keys. We are going to use this method, which is based on a total of two certificates that must be present in the client and server, and two keys, one public and one private, to establish encrypted communication. We will see all this in an extended way when we reach the corresponding step.
If you want to know more about what a VPN is and how OpenVPN works, we leave you with a couple of articles from our collection.
- What is a VPN
- What is OpenVPN and what features does it give us in Virtual Private Networks?
OpenVPN server configuration on Windows
The first step we must do to create a VPN is to configure our OpenVPN server. For this, we have chosen to use a simple computer from our network with Windows 10, which almost all of us will have at home, not requiring Windows Server or anything like that.
Installing the OpenVPN program on Windows
The first step we must do is to install OpenVPN on our operating system. It is an open-source program and completely free to purchase from the official website. The same program will serve both to mount the server and to access it from the client, so we must have it on both computers.
If we access the website we will see that there are different versions, including some paid ones or VPN connection services. In short, it is both an open-source project and a community that offers servers around the world for the connection of subscribed, free, or paid clients.
In any case, we are going to download the Windows Installer OpenVPN.exe version for our system from here.
After downloading, the installation in its first steps has no secret. It will be in the third step where we will have to activate the “EasyRSA 2 Certificate Management Scripts” option. This option will be very important for us since we will need to generate the certificates for the server and client and thus carry out the encrypted connection.
Among the options, we can see that the OpenVPN service will be installed, the window mode (GUI) to carry out the communication, and a virtual TAP network adapter through which the IP configuration for the VPN network and communication will be carried out.
Finally, we choose the installation directory, which we recommend to be located in the program files folder in the 64-bit version. During the installation process, it is possible that a window will open to accept the installation of the TAP adapter, to which we will have to say “ install ”. In Windows 10, this window has not appeared because we already have a TAP installed from before.
OpenVPN vars.bat file configuration
We have already installed the necessary program to create a VPN with OpenVPN in Windows, the second step will be to carry out the previous configuration of the vars.bat file that will later supply the necessary information for the certificates.
This process must be done from a command window, either the Power Shell or the Command Prompt, we will use the latter. So we are going to go to our start menu and write for example “cmd”.
Very importantly, we must open it with administrator permissions for the commands to take effect.
Now we are going to go to the following path in our file explorer or directly in the terminal:
We need to place ourselves in this directory with the command terminal, so for this, we are going to write the command “cd” followed by the copied or written path:
This route will appear in the prompt once we are inside. Now it will be our turn to place the command to start the configuration, after writing each command we must press Enter to execute it:
init-config
This command should not show any output, which means that everything went well. If, for example, a message is displayed stating that “it is not recognized as an internal command…” it means that we are not in the correct directory. Next, we write:
copy vars.bat.sample vars.bat
Once the backup file is made, we are going to edit the new vars.bat file with Notepad, so we write:
The notepad will open and we will have to locate the lines of the following capture and modify them with our data. We must replace the default ones with the new ones without modifying anything that is before the “=”.
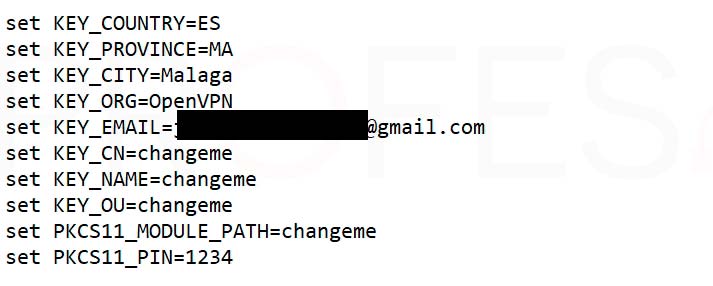
From the key ” KEY_EMAIL ” it is not necessary to modify the parameters, although if we wish, we can do so. These data can be whatever we want, although the least we can do is be somewhat rigorous in the initials of the country and so on.
Next, we must save the file in the same directory in which it was opened, that is, C:\Program Files\OpenVPN\easy-rsa. If it reports a permissions error (which it shouldn’t), we’ll save it somewhere else and then copy and paste it into this directory, replacing the existing one.
We return to the command terminal again to place a few more. We will proceed to execute the file as we have left it:
vars.bat
And then we will execute a second file:
clean all
This process should have finished without major problems since it is a fairly simple step that is limited to copying and pasting the commands. We should not close the command terminal, since we are going to continue using it.
Generation of keys and certificates for the OpenVPN server
The next step to create a VPN with OpenVPN on Windows is to create the server certificates that will later be necessary for the connection. The final result of this step will be to have a total of 4 files.
Continuing where we left off before, we write in the terminal the following:
build-ca
At this time, the process for the generation of the certifying entity will be executed, which will later be in charge of generating our certificates. The lines that we have previously modified with our notepad will begin to appear again.
Of course, we have already done part of the work, so we do not need to fill in some gaps, specifically those that have the information previously written by us in brackets, so in these, we simply press Enter to go to the next one.
We only have to stop when it asks for “ Common Name (eg, your name or your server’s hostname) [] ”. Here we are going to put the name of our VPN server. It does not have to be the name of the network equipment in principle, although it is one that we remember later. If we leave it by default, the name will be OpenVPN-CA.
After this, we can now proceed with the creation of the server keys, so we write the following:
build-key-server server
The key generation process will be quite similar to the above. It will ask us again for the same data, so we will press Enter until we reach the “ Common Name ” section again. Now we are going to write in it “server”.
We will go ahead with the generation and you will get something similar to the following screenshot. It is not mandatory that we fill in the “extra” attribute lines, although it will not hurt. To finish the script, it will ask us two questions to conclude the creation of the keys and the signature, so we will press “y” in both cases.
Done, all that remains is to generate the encryption of the files, so we place the following command:
build-dh
Depending on your hardware, the encryption process may take anywhere from a few seconds to a few minutes. In any case, let’s be patient and wait for the process to finish.
Server Parameter Configuration
We come to the next critical point of creating a VPN with OpenVPN, that of configuring our server with the appropriate parameters so that it connects creates the VPN network, and assigns IP addresses to the clients that we connect. This process is done from the graphical interface, although of course it can be done from the command terminal.
The OpenVPN server configuration is based on a configuration file, in true Linux style since it is ultimately open source. Now we are going to go to the following folder:
C:\Program Files\OpenVPN\sample-config
We are going to copy the “server” file to the program configuration directory, which will be:
C:\Program Files\OpenVPN\config
The next step is to edit the newly copied file with a program that misplaces the configuration lines. We recommend a program like Wordpad, which we all have on our system, since Notepad may mess up the entire file content and be less readable.
From this file, we will have to modify a few quite important sections to be able to link the server to the generated certificates and deliver IP addresses to the clients.
Protocol section to use
It is not mandatory, but during the start and connection of the server on our computer, we received an alert because the server “does not know” which protocol to use between IPv4 and IPv6.
For this, we are going to create a second line specifying the main protocol used, which will be udp4. We have left these two lines as follows:
We insist it is not mandatory since the server will work perfectly even without doing this. But it is a way to remove the warning in the initialization process.
VPN tunnel section
The next section that we must modify is just below the previous one, which will be the assignment of the tunneling method as “ dev tap ”. We can use any of them, although the tap node supports a greater number of protocols than the tun mode.
In some other media tutorials, they perform a bridge mode configuration between the TAP network adapter created by OpenVPN and the physical network adapter. This is not necessary for the mode that we have chosen, and the operation will be completely correct.
Configuring certificate paths
The following section is essential since we must tell the server where to get the certificates and keys to establish the connection. And although they are not yet copied to the file that we indicated, we will do it later.
So in the lines where it says:
ca ca.crt
cert server.crt
key server.key
And the one just below:
dh dh2048.pem
Let’s replace them with the following:
ca "C:\\Program Files\\OpenVPN\\config\\ca.crt"
cert "C:\\Program Files\\OpenVPN\\config\\server.crt"
key "C:\\Program Files\\ OpenVPN\\config\\server.key"
dh "C:\\Program Files\\OpenVPN\\config\\dh2048.pem"
At this point we must do a necessary check on the dh2048pem file. We will go to the path C:\Program Files\OpenVPN\easy-rsa and we will check if the created file is called like this or if it is dh4096.pem. If this were your case, the last path would be: dh “C:\\Program Files\\OpenVPN\\config\\dh4096.pem”
VPN network IP addresses
The last section that we need to modify in the file is the one for assigning the network IP address to the server, whose line is a little further down if we continue browsing.
If we wish, we can leave this line as it is, in this way the VPN server will adopt the IP address 10.8.0.1 in its TAP adapter and will continue to have the real IP of our internal LAN. Likewise, the IP assignment to the connected clients will go from 10.8.0.2 to 10.8.0.254 with a class C mask.
It is important to take into account that, if our router, for example, has the IP address 192.168.0.1, we should not use the 192.168.0.0 network in the configuration file, since the router’s IP would conflict with that of the TAP, and the connection could not be made. So we must make sure to either choose another IP for the router or use another network IP.
And finally, we must make sure that the line:
tls-auth ta.key 0
It must have the value “0” and not “1” since the value 0 is left for the server, while 1 is left for the client’s configuration file.
With all these modifications, we are going to save the file with its same name in the configuration directory. Again, if there are saving permission problems, let’s save it to another directory, for example, the desktop, and then move it to where it should be.
We can still carry out an extra configuration in case we want all the traffic of the client computer to be redirected by the VPN. To do this we will activate the push option “redirect-gateway def1 bypass-dhcp” in the configuration file.
Generation of ta. key, modification of the path, and copy of certificates and keys to config,
There is little left to finish with the configuration of the OpenVPN server, although we still have to make one last visit to the command terminal and create the last necessary file.
But for this it is necessary, well, rather optional to modify the Windows path. The path is where the system looks for the commands that are executed in the terminal, for example, config, telnet, ssh, etc. We are going to execute one called “ openvpn ” and this is in the directory:
C:\Program Files\OpenVPN\bin
So there are two options, either place the command prompt in this directory and run “OpenVPN” directly, or add the route to the path. Let’s do the latter to see the procedure:
We are going to go with the right button on “ My Computer ” and open “ Properties ”. In the window that appears, we are going to click on “ advanced system configuration ”.
Next, we will access the “ Environment Variables ” section in the “ Advanced Options ” tab.
In the window that opens we are going to go to the “ Path ” line, select it and then click on “ Edit… ”. In the umpteenth open window, we are finally going to paste the previously commented path into an available slot. We accept all open windows and we will now have the OpenVPN command available directly in the command terminal.
Now we are in a position to place the following command:
openvpn --genkey --secret ta.key
In this way, we will have created the last key needed for the server. You can do it with the modified path or from the “\bin” directory, you choose.
Finally, we are going to take these four generated files that should be in:
C:\Program Files\OpenVPN\easy-rsa\keys and in \easy-rsa
Of course, if we have executed openvpn from \bin, then the tab key will be in that directory, it is logical. And we are going to paste them in:
C:\Program Files\OpenVPN\config
So that in this way we have a directory with a total of 7 files, including the readme.
We start the OpenVPN service and the server will be ready
It has been difficult, but we already have almost all the ingredients to create a VPN with OpenVPN in Windows 10. So now comes the moment of truth, where we are going to start the server. If we have followed the steps to the letter, everything will go smoothly.
We just have to go to the desktop and run “ OpenVPN GUI ” to start the service. Next, we will go to the taskbar and click on the “ Connect ” option in the OpenVPN server drop-down menu.
We will have to allow the access of the OpenVPN service to the networks through the Windows firewall, and if we plan to use it with WiFi and remotely then we are going to activate the boxes for private and public networks.
Finally, the service will start correctly when we see a log like the following.
Fixed IP assignment on the server
The next step for creating a VPN network with OpenVPN in Windows will be to assign a fixed IP address to the computer that will act as the server. We can do this in two ways:
- Well-assigned IP address directly from the router associated with the MAC of the network card.
- Fixed IP configuration in Windows
Because it is more generic, we are going to carry out the second option, which is very quick and simple. First of all, we go to the taskbar, and with the right button on the network icon we choose “ Change network and Internet settings ”.
Next, we will access the Windows configuration, where we will access the option “ Change adapter options ”.
In the new window we must open the properties of the adapter that we are using for the network connection, in our case, which is not recommended, we are using a WiFi network card. We say this because it is normal for a server to be connected by cable, for stability, bandwidth, and security.
This will be quite familiar to you, we are located on the line of ” Internet protocol version 4 ” and click on ” properties “. Now we can place the IP address that we think is convenient.
We will have to choose an IP address that belongs to the LAN of our router, without being one that ends in .0, .1, or .255. The network mask will generally be type C so it will be the same as the one you have in the screenshot. The DNS will simply be our router as primary and, for example, Google’s 8.8.8.8 as secondary.
Opening of ports in the router and DDNS (in case of using remote connections)
This will only have to be done by those who want to use their OpenVPN server not only in the internal home network and local computers but to connect from anywhere in the world. As we mentioned at the beginning, there will be two requirements to take into account, opening the port used by OpenVPN, and having a fixed IP or, if applicable, using a DDNS, such as DYNDNS.
Let’s start with the first ingredient, which will be to open UDP port 1194 on our router. The process will be different depending on the router you have, but you can configure port forwarding on absolutely all of them.
We will access our router with the corresponding IP address and then the section where the ports are opened. It will normally be found in the WAN section. The data that we will place will be the external port 1194, the IP of our server, which in our case would be 11.11.11.3, and the UDP protocol that we have selected.
Let’s not confuse the IP assigned to the server in the TAP adapter for the VPN, since the real IP of the server will be the one provided by the router. This is what we must associate with the opening of ports.
The next step would be to configure a DDNS in case or not that we have a real fixed IP address, that is, the one that takes us to the Internet and that has been delivered by our connection provider.
The best place to associate a domain to our IP will be dyndns.com, a free service that is very easy to use and compatible with most routers.
With these two ingredients, we can have access from outside to our VPN server. It is worth asking our provider if we have unlocked remote access since there are providers where we must contract this access with a fixed IP.
Client configuration
We have already seen how to create a VPN network with OpenVPN in Windows, now it is time to learn how to configure an OpenVPN client, which in this case will be a simple and fast task compared to what we have seen before.
The first thing we need to do is install the OpenVPN program on our client, exactly the same as when we did it on the server, and with the “ EasyRSA 2 Certificate Management Scripts ” option enabled in this case as well.
Unfortunately, we are going to have to go back to the server to generate the keys of our clients or clients that we have. It is a small disadvantage of using OpenVPN since everything is based on certificates and keys. To give you a summary, the client must have a total of 5 files:
- Client OpenVPN
- Crt (already created on the server)
- Key (already created on the server)
- CRT
- Key
So we would need to create these two, let’s get down to business.
Creation of certificate and key for clients FROM THE SERVER
Let’s proceed to the creation of these two certificates, which in this case will be relatively fast, knowing the procedure from the previous section.
We will open the Windows command terminal again with administrator permissions and we will go to the directory:
C:\Program Files\OpenVPN\easy-rsa
We will execute these two commands:
vars
build-key client_name
In the second command, we are going to place the name of the client with which we are going to connect. Again, it should be noted that it does not need to be the name of the computer or the name of the user who has logged on to the computer. It can be the one that we really want.
That said, we press Enter in all the gaps that have been filled until we see the “ Common Name ”, in which we will have to put the name of the user for whom we are creating the certificate. Likewise, we will answer with a “y” to the last two questions to end the process.
Now we copy the corresponding certificates and keys to transport them to the client’s computer, which will be:
- crt (already created on the server)
- key (already created on the server)
- CRT
- key
We will have to place the 4 files in the client path:
C:\Program Files\OpenVPN\config
client configuration
Now we must carry out a procedure similar to that of the server with the client configuration file. Although in this case we will take the ” client ” file from the route:
C:\Program Files\OpenVPN\sample-config
And we will place it in the route:
C:\Program Files\OpenVPN\config
We will also need to rename it with “ client_name ” as the process is seen in these screenshots.
Once again we must activate the option “ dev tap ” so that the tunnel method adjusts to one of the servers.
The next line to modify and very important will be the one that saves the IP address of the server. In our case, we will place the internal IP address of the server, since we are going to carry out the example with a device from the same LAN network.
But if you are going to connect remotely, then you will need to enter the real IP address of your router or, if applicable, the DDNS address that you have configured.
Finally, we must modify the lines that link to the certificates and connection keys. The result should be the following:
ca "C:\\Program Files\\OpenVPN\\config\\ca.crt"
cert "C:\\Program Files\\OpenVPN\\config\\client_name.crt"
key "C:\\Program Files\\ OpenVPN\\config\\client_name.key"
With this, everything would be perfectly configured to make the connection between the client–server. We save the file with the client_name in the config directory and it will be our turn to make the connection.
OpenVPN server connection
Fortunately, we only have to run OpenVPN GUI on the client and carry out the connection procedure exactly the same as the server. If we have done everything correctly, then the equipment will connect without problems. This will be reflected in both the client log and the server log.
If everything is correct, the VPN icon on the taskbar should be green. If it is in yellow it means that the connection could not be made.
We recommend testing with a client in the local network if everything goes well before going outside our network since in this way we are verifying and ruling out possible errors that we have made.
Conclusions about creating a VPN with OpenVPN on Windows
Finally, we end this long tutorial where we have configured both the OpenVPN server in Windows, as well as a client on our test LAN network. We can start precisely here, and later make the leap to remote access by opening the corresponding ports and assigning DDNS.
We believe we have covered all the possible problems that we have encountered during the process by making a fully explained step-by-step configuration of what each option and each certificate created implies.
For those of you who have an Asus, TP-Link, NETGEAR, or similar router, it is worth taking a look to check that they are compatible with VPN services. Since in many cases, you will be able to mount the server itself on itself and avoid having a team dedicated to providing the connection service. We leave you with some network tutorials that we think are interesting:
We hope this tutorial has been useful. If you have had any problems, do not hesitate to leave them in the comments or open a thread in our hardware forum.